Here is a link to a PREZI which charts the evolution of my work during the concepts and contexts module.
http://prezi.com/xoo5skuzcqmy/?utm_campaign=share&utm_medium=copy
Tuesday, 24 May 2016
Friday, 20 May 2016
SIBLINGS: LINKS TO FINAL SIBLINGS EDIT & WORK IN-SITU
Here are two videos to the final completed Siblings 11-10-8 piece. The footage is hosted on Vimeo as this allows for HD and a more professional way of viewing video content on-line compared to youtube.
Firstly here is a 5:34 clip of the installation in-situ in the room I used to house it. It is hard to judge the scale with no-one in the shot to give an impression of the size. However the screens were all 160cm by 90cm and as mentioned earlier were set at above the audiences eye-line 135cm off the ground therefore about 210cm to the boys eyes which is about 7 feet off the ground. The light under the middle screen is the reflection of light on a white projector.
SIBLINGS IN-SITU VIMEO from Jon Saward on Vimeo.
Here is a 10:12 video of the finished edited clips from each of the screens. I chose to put them into one movie so that you can see how they all work together but obviously they were three separate entities left, middle and right that all come together in the installation when running together. I have put them on a white background so you can clearly see all three screens. In reality when running as an installation they were on a black background as you can see from the clip above but I put them on white so that they can be appreciated as the three separate frame elements.
SIBLINGS FINAL VIMEO WHITE BG from Jon Saward on Vimeo.
Thursday, 19 May 2016
SIBLINGS: INSTALLING THE INSTALLATION
The final installation of the piece had to be left until the evening of the day before I had to exhibit the piece due to availability of the room. Whilst testing had taken place to make sure the hardware, software and construction in theory the piece would work the all of the elements had not been built and fully tested.

Constructing the Screens
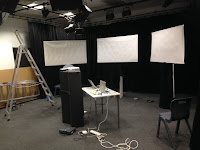
The first thing that needed building was the screens. I had done a very basic mock up of these but due to the delicate nature of their construction I had nowhere to safely store them if made prior to the evening before so they had be made at the last minute. They were constructed from two cut 160cm lengths of 1.5 X 2.5 wood with thick white paper used for photographic backdrops. This was to use materials I had available to me as well as to keep costs down. The size of the screens was to be 160cm by 90cm and not only keeping to the 16:9 screen ration of the video footage but also as this was the optimum size to fit inside the studio. I would have liked a little better so the boys were even bigger and more impressive to the audience BUT space in the TV studio would not accommodate this. The paper is curly by nature as it is stored on rolls and was a pain to work with and I dragged in some extra help and hands to do this. With some careful measuring, scoring, cutting, wrapping, stapling and trimming and a lot of blood sweat and tears three screens were constructed. There was still a little curl to the paper itself which was a bit of a pain but some double sided sticky tape helped to solve this it was also hoped that once hanging in the gallery space (Blacked out TV studio) overnight then the curl would fall out.

Preparing the Gallery Space
As mentioned earlier the gallery space was the TV studio at Suffolk New College. This was due to the space it offered, the availability to me to use it and the fact that you can black it out which was necessary to the success of the installation. I wanted the boys suspended in mid air and as the background of the TV studio and the background of the footage was back the boys talking heads would loom and float mid-air. The space needed a huge tidy and then the black drapes pulled around to black out the room. I did play with a couple of lights from the lighting grid on once the installation was in but there was JUST enough light from the projections to slightly light the room and it looked much better without them.

Hanging the Screens
The three screens were designed to be hand from the lighting grid in the TV studio and to be anchored on the floor. This was to prevent and swaying and movement on them once installed. The plan was to suspend them invisibly at above eye level so that the screens would loom a little over the audience making the audience feel in awe of and intimidated by the installation and the boys heads. This look was achieved by using very dark green coated garden wire for strength and stability and this was threaded through pre-drilled holes at the tops of the screens then through pre-drilled holes at the bottom then anchored to the floor. A crimp was used to hold the top edge of the screen up and in place. Installing these was a nightmare as making sure they were all the right height, level and the side screens at the right angles was hugely time consuming. They also had to be tested for the projections and lots or tiny alterations was needed.


Projectors and Installation
The projectors were the trickiest element of all as I wanted the images to completely fill the 160cm by 90cm screens with no overspill. For this they needed to be exactly 90 degrees to the screens. I had planned to put all of the screens on plinths that were about 80cm tall but this created two issues. Firstly being this tall they were a little too high and just entered the gaze of the viewers and were a tiny bit distracting from the three screens. Secondly it created real issues of getting the projectors at 90 degrees from the screens for proper projection.

My maths and planning was not quite spot on and in order to get the projectors in the right place they would have had to have been stacked one on top of another. In order to get around this I tried them lower down on a table and this eliminated the height problem but not the angle problem. The solution was to leave one projector on the table but to put the other two on stands which allowed the 90 degree angle to their respective screens. They were higher BUT not too high.

With use of the keystone feature on the projectors which allows the video frames perspective to be altered to make them square when projected from a lower angle to get rid of the distortion this called. Another issue was having to use three different projectors and all of them were not calibrated to be exactly the same. I adjusted the colour and white balance to try and get them as close as I could but still there were minor differences.

Computers to run the Clips
Three Macbook Pro computers were used to play the clips as these had the necessary processing power and I had use of three for the installation, one for each screen. As mentioned before I did play around with and consider DVD's and media players but these proved to be the most cost effective and stable ways of playing the clips. From the Macs i used 3 Mac monitor out to VGA convertors and then VGA leads from these into the projectors.

The clips were encoded using the H.264 codec which is an MPEG4 mov file which is very happy being played in Quicktime. These could be played out by getting the projectors to mirror the computer screens and then setting them to full screen mode getting rid of everything but the videos to be projected. These did all need to be triggered at the same time but could then be set to loop and provide a continuous screening. As all of the computers did not run at exactly the same time they were not the perfect solution and did need to be synched again from time to time but were adequate and compensations were made for this in the edited clips.

Sound and Speakers
The sound from each video on the screens I wanted to come from behind the screen itself. The aim was to attract the attention of the audience to the screens by having the voice project from them or the boys. This was achieved by creating plinths behind each of the screens to lift the speaker out of view and behind the screens. These were white and too short, but with a paint can on top and some black cloth wrapped around them they were hidden invisibly in the set. The speakers were dynamic and needed sound to power them so cables were run and hidden to do this. 5 metre cables which were 3.5mm mini jack from the computers to phono connections on the speakers were then connected. The speakers had adjustable volume and these all needed balancing with the computers to get them all to the same level.

The finished result worked pretty well and was exceptionally close to how I had envisaged it with only a few minor issues but it did fulfil most of my aims and objectives as outlined below.
Here is a 5:30 clip of the installation working in its gallery environment I created.
SIBLINGS IN-SITU VIMEO from Jon Saward on Vimeo.

Constructing the Screens
The first thing that needed building was the screens. I had done a very basic mock up of these but due to the delicate nature of their construction I had nowhere to safely store them if made prior to the evening before so they had be made at the last minute. They were constructed from two cut 160cm lengths of 1.5 X 2.5 wood with thick white paper used for photographic backdrops. This was to use materials I had available to me as well as to keep costs down. The size of the screens was to be 160cm by 90cm and not only keeping to the 16:9 screen ration of the video footage but also as this was the optimum size to fit inside the studio. I would have liked a little better so the boys were even bigger and more impressive to the audience BUT space in the TV studio would not accommodate this. The paper is curly by nature as it is stored on rolls and was a pain to work with and I dragged in some extra help and hands to do this. With some careful measuring, scoring, cutting, wrapping, stapling and trimming and a lot of blood sweat and tears three screens were constructed. There was still a little curl to the paper itself which was a bit of a pain but some double sided sticky tape helped to solve this it was also hoped that once hanging in the gallery space (Blacked out TV studio) overnight then the curl would fall out.

As mentioned earlier the gallery space was the TV studio at Suffolk New College. This was due to the space it offered, the availability to me to use it and the fact that you can black it out which was necessary to the success of the installation. I wanted the boys suspended in mid air and as the background of the TV studio and the background of the footage was back the boys talking heads would loom and float mid-air. The space needed a huge tidy and then the black drapes pulled around to black out the room. I did play with a couple of lights from the lighting grid on once the installation was in but there was JUST enough light from the projections to slightly light the room and it looked much better without them.


The three screens were designed to be hand from the lighting grid in the TV studio and to be anchored on the floor. This was to prevent and swaying and movement on them once installed. The plan was to suspend them invisibly at above eye level so that the screens would loom a little over the audience making the audience feel in awe of and intimidated by the installation and the boys heads. This look was achieved by using very dark green coated garden wire for strength and stability and this was threaded through pre-drilled holes at the tops of the screens then through pre-drilled holes at the bottom then anchored to the floor. A crimp was used to hold the top edge of the screen up and in place. Installing these was a nightmare as making sure they were all the right height, level and the side screens at the right angles was hugely time consuming. They also had to be tested for the projections and lots or tiny alterations was needed.


Projectors and Installation
The projectors were the trickiest element of all as I wanted the images to completely fill the 160cm by 90cm screens with no overspill. For this they needed to be exactly 90 degrees to the screens. I had planned to put all of the screens on plinths that were about 80cm tall but this created two issues. Firstly being this tall they were a little too high and just entered the gaze of the viewers and were a tiny bit distracting from the three screens. Secondly it created real issues of getting the projectors at 90 degrees from the screens for proper projection.

My maths and planning was not quite spot on and in order to get the projectors in the right place they would have had to have been stacked one on top of another. In order to get around this I tried them lower down on a table and this eliminated the height problem but not the angle problem. The solution was to leave one projector on the table but to put the other two on stands which allowed the 90 degree angle to their respective screens. They were higher BUT not too high.

With use of the keystone feature on the projectors which allows the video frames perspective to be altered to make them square when projected from a lower angle to get rid of the distortion this called. Another issue was having to use three different projectors and all of them were not calibrated to be exactly the same. I adjusted the colour and white balance to try and get them as close as I could but still there were minor differences.

Computers to run the Clips
Three Macbook Pro computers were used to play the clips as these had the necessary processing power and I had use of three for the installation, one for each screen. As mentioned before I did play around with and consider DVD's and media players but these proved to be the most cost effective and stable ways of playing the clips. From the Macs i used 3 Mac monitor out to VGA convertors and then VGA leads from these into the projectors.

The clips were encoded using the H.264 codec which is an MPEG4 mov file which is very happy being played in Quicktime. These could be played out by getting the projectors to mirror the computer screens and then setting them to full screen mode getting rid of everything but the videos to be projected. These did all need to be triggered at the same time but could then be set to loop and provide a continuous screening. As all of the computers did not run at exactly the same time they were not the perfect solution and did need to be synched again from time to time but were adequate and compensations were made for this in the edited clips.

Sound and Speakers
The sound from each video on the screens I wanted to come from behind the screen itself. The aim was to attract the attention of the audience to the screens by having the voice project from them or the boys. This was achieved by creating plinths behind each of the screens to lift the speaker out of view and behind the screens. These were white and too short, but with a paint can on top and some black cloth wrapped around them they were hidden invisibly in the set. The speakers were dynamic and needed sound to power them so cables were run and hidden to do this. 5 metre cables which were 3.5mm mini jack from the computers to phono connections on the speakers were then connected. The speakers had adjustable volume and these all needed balancing with the computers to get them all to the same level.

The finished result worked pretty well and was exceptionally close to how I had envisaged it with only a few minor issues but it did fulfil most of my aims and objectives as outlined below.
- The blacked out studio/gallery environment I created was the right atmosphere. It drew full attention to the projections with no distractions.
- Screens could be bigger but were on a scale that dominated the audience slightly.
- Positioning good as at a higher angle to the audience therefore again slightly dominating them.
- The projectors were all positioned OK but this would need more thought this time. Keystoning the images helped this though. Back-projection would have been better if the space would allow for this.
- The screens were OK for home-made but the paper did not straighten 100%. A better solution such as purchasing screens or making canvas screens would be looked at next time.
- Projector noise was a little bit of an issue but not major and did not really detract from the
- The colour on the projectors was not all exactly yhr same
- Synching of the three videos pretty good. Room for improvement there for absolutely spot on synching. Will need to investigate other technologies.
- The sound from the speakers coming from directly behind the screens as the boys spoke worked really well.
Here is a 5:30 clip of the installation working in its gallery environment I created.
SIBLINGS IN-SITU VIMEO from Jon Saward on Vimeo.
Thursday, 12 May 2016
SIBLINGS: REFLECTIONS ON PROJECT
This project has been a huge learning curve and there have been many lessons learnt from this project and I have outlined many of them below.
- Less is more. Paring and stripping down my work and not throwing the kitchen sink at it can work. From initial OTT graphics, effects and animation by getting the the essence of the piece and simplicity the message can be stronger.
- Ideas, concept and the work should dictate the style not the other way around. With the Poetic Love piece I was developing with my grandma I tried to shoehorn it into a preconceived style and it was round peg, square hole. Similarly with the Siblings piece I went OTT on style at the start. I need to consider getting form to serve content and character and narrative in my arts practice more.
- Installations can inform, educate and entertain and documentary work and ideas can be interpreted in an installation.
- Working on three screens and to get them interacting offers huge narrative and character as well and storytelling opportunities.
- I actually do like and can enjoy and appreciate installations and have got over my hang-ups about them. As with everything there are the good and bad but I need to experience even more and in-situ if possible.
- Working with 3 kids and three sets of kit for 3 screens is hard. Meticulous planning and execution is needed.
- A lot of discipline is needed when working with family. A separation of parent and film-maker is needed to retain objectivity about the work and avoid too much subjectivity. Impossible to do 100% but you need to almost operate two personas. Dad as dad AND dad the filmmaker.
- Post production with three screens and narratives that are interdependent is a brain melt. Detailed planning and preparation and organisation is a must.
- I can extend my practice into other interesting areas. Far from being separate from my previous practice they can both influence and inform each other.
- More research testing and understanding is needed. In future i would do lots more testing and get a close as I could to a full scale mock up of the installation in advance of the screening of the piece. It was very close to the wire.
- More experimentation with technologies to ease the screening of the installation.
- A clarity of vision is great but I need to experiment more and be more flexible. That said the final installation structure in the gallery itself is very close to how I imagined it. The content on the screens however has been the real journey.
- More looking around at other practitioners has opened my eyes to lots of possibilities. This is from not only moving image based work but also from other art spheres and disciplines.
- Balance looking around for inspiration with not being too influenced by it. I have found it is far too easy to pick up lots of tropes and ideas but sometimes they can influence my work too much. I feel I need a clarity of vision and idea before doing too much research or it is too easy to be influenced by others.
Wednesday, 11 May 2016
SIBLINGS FINAL POST-PRODUCTION
Following on from the second shoot and managing to get all of the lip-synch voice over recordings done I finally had all of the footage, sound and assets at my disposal. The main issue that I was going to face was time. With the delay in getting the footage all shot although I had been editing and working on the footage that I had shot there was a lot still to do and a deadline looming. An ill wife for the past month and a busy time at work was not helping either.

The editing carried on in a very similar vein to the initial editing as far as workflow, organisation and using the software went that I have mentioned in my earlier editing post. Similar issues cropped up again and these have been listed below.
LIP-SYNCHING AND SOUND ISSUES
Nearly impossible to get 100% due to phrasing, inflection, tone and pacing. Lots of man hours BUT have got it all pretty close. People obviously will know that the voices of others coming out of the boys mouthes are not their own as the boys are talking themselves in there own voices in the piece. HOWEVER they do need to be as close as possible and I am getting there. The process of this is lengthy and outlined below.
GRADING THE FOOTAGE
Needs doing but I will leave to the end if time. I am warming to the different types of footage of the boys rather than a uniform one which due to lighting and white balance would have been near on impossible to keep a constant across three shoots over three shooting days in two locations.

LENGTH OF THE PIECE
Due to time constraints to complete the final edit which I envisage being about 20 minutes and the screening time for my MA tutors being only 10 minutes I have worked towards a 10ish minute edit. This will include all of the elements of the piece
STRUCTURAL & NARRATIVE DESIGN
Getting there in my opinion but it has been an uphill battle. I feel the start and the end work well to bookend the piece. Throughout I wanted to mix up all of the opinions on the boys and their own thoughts. I decided that they needed more space and as edits developed so did the screen-time devoted to the boys themselves and their on screen antics. The voices of others commenting on them grew less and less and were almost insterstituals in-between their own thoughts and added a different pace. Keeping these brief allowed more comments on the boys in the piece and focussed on them and their POV more. Keeping the voices of others brief also made their views seem more blunt and one dimensional which I feel works as snapshots of opinions of the boys. The fact that these were shot single camera and then edited together so the boys do not interact added to this.
AUDIENCE FEEDBACK ON EDITS (NOT SCREENING)
I have screened rough cut elements in various of stages throughout as well as to my MA peers and their feedback was a real help to crafting the final version. They were not surprisingly similar to the feedback from my MA peers from the crits we had. Some points are outlined below.
PREPARING FOOTAGE TO BE SCREENED
The issue here was if I would have been able to 100% bang on synch all of the footage from the projectors together so they would be exact. Time, technical and financial limitations means that on this screening that this will not be the case. From my experiments trying this out a half second delay between screens could be encountered so I added this gap during my edits. Further experiments with MIDI, SDS and bluetooth may bear fruit but for this exhibition for my tutors are simply not going to happen. For this reason I added a little more of a pause between comments were I could and they were shot single scree. Also where the boys were recorded three camera and the sound from one spilled into one another I went in and cleaned it out. This was so if it did not synch super close the voices would not overlap or seem too weird.

The editing carried on in a very similar vein to the initial editing as far as workflow, organisation and using the software went that I have mentioned in my earlier editing post. Similar issues cropped up again and these have been listed below.
LIP-SYNCHING AND SOUND ISSUES
Nearly impossible to get 100% due to phrasing, inflection, tone and pacing. Lots of man hours BUT have got it all pretty close. People obviously will know that the voices of others coming out of the boys mouthes are not their own as the boys are talking themselves in there own voices in the piece. HOWEVER they do need to be as close as possible and I am getting there. The process of this is lengthy and outlined below.
- Recorded the boys in-vision doing saying the parents lines
- Take the clips and put them in a timeline on Adobe Premiere Pro.
- Cueing them up to exact points on the timeline. So the boys audio to start on 1:00 minute.
- Using the play-head in Adobe Premiere Pro and also the waveform as a guide to the start.
- Also the picture of the boys on display and their version of the statement.
- The above: timing, play-head, boys in vision and waveform it all act as a guide for parents.
- Play the clip through so the parents can get the boys timing, inclination, phrasing and tempo.
- Then keep recording on a TASCAM digital recorder the audio until they got it bang on.
- Then the audio files of the parents audio that were recorded are imported into Premiere Pro.
- The audio files are then synched up to replace the boys saying the lines.
- Minor alterations in timing, starting and spacing are added to get the lip-synch to look right.
- Leaving a minimum of 1 second between boys talking as this allows for lagging in the playback. It does make it look a little stilted BUT this added to the effect.
- The boys are in the clip with their lips moving and the sound from the parents coming out.
GRADING THE FOOTAGE
Needs doing but I will leave to the end if time. I am warming to the different types of footage of the boys rather than a uniform one which due to lighting and white balance would have been near on impossible to keep a constant across three shoots over three shooting days in two locations.

LENGTH OF THE PIECE
Due to time constraints to complete the final edit which I envisage being about 20 minutes and the screening time for my MA tutors being only 10 minutes I have worked towards a 10ish minute edit. This will include all of the elements of the piece
STRUCTURAL & NARRATIVE DESIGN
Getting there in my opinion but it has been an uphill battle. I feel the start and the end work well to bookend the piece. Throughout I wanted to mix up all of the opinions on the boys and their own thoughts. I decided that they needed more space and as edits developed so did the screen-time devoted to the boys themselves and their on screen antics. The voices of others commenting on them grew less and less and were almost insterstituals in-between their own thoughts and added a different pace. Keeping these brief allowed more comments on the boys in the piece and focussed on them and their POV more. Keeping the voices of others brief also made their views seem more blunt and one dimensional which I feel works as snapshots of opinions of the boys. The fact that these were shot single camera and then edited together so the boys do not interact added to this.
AUDIENCE FEEDBACK ON EDITS (NOT SCREENING)
I have screened rough cut elements in various of stages throughout as well as to my MA peers and their feedback was a real help to crafting the final version. They were not surprisingly similar to the feedback from my MA peers from the crits we had. Some points are outlined below.
- They loved the bits of the boys together as did I so more of this was added.
- Liked the newer additions of the boys questioning each other and responses.
- Short and sweet on the views of others was liked best in - make their points - then out.
- The three screens of the same son also went down well and added another dimension.
- They liked the boys simply just being on the screen Those with kids recognised traits of their own, they realised that they were playing a little for the camera at times but added some entertainment and fun. They also pointed out that as two of them looked very similar Jacob and Noah their poses and body language helped through watching to tell them appart.
- The MES worked well with the plain black background
- Sound was generally good but a few minor issues were pointed out over levels.
- Most did not really notice the difference between the images in terms of lighting, so did not see the need for grading. When I did point it out they did then notice but it did not bother most of them. The only people who did pull me up on it were a couple of media teachers and editors.
- The feedback from no real explanation as to the messages, values and ideology generally hit the nail on the head. There was enough mention to get the teachers dues to mention of class, school etc. Most of the audience pieced together the duality of voices of myself and my wife as the parents. The Psychologists was not as successful but generally most did get that it was an experts voice due the tonality of it and distancing language used "first born child" etc.
- The title siblings 11-10-8 worked well and did frame the piece. Some confusion over if it may be a date but made sense once explained it was the boys ages at the time of recording and could be a series re-visited in 10 years then being 21-20-18.
LAYING OFF THE FOOTAGE
Due to editing the footage on three separate tracks one for each screen NOT son the process was not too complicated. It simply involved exporting each track individually. I did have to go through each track once separated with a fine tooth-comb to alienate any sound or picture issues which took a lot of time but it did work well.
The issue here was if I would have been able to 100% bang on synch all of the footage from the projectors together so they would be exact. Time, technical and financial limitations means that on this screening that this will not be the case. From my experiments trying this out a half second delay between screens could be encountered so I added this gap during my edits. Further experiments with MIDI, SDS and bluetooth may bear fruit but for this exhibition for my tutors are simply not going to happen. For this reason I added a little more of a pause between comments were I could and they were shot single scree. Also where the boys were recorded three camera and the sound from one spilled into one another I went in and cleaned it out. This was so if it did not synch super close the voices would not overlap or seem too weird.
Monday, 9 May 2016
SIBLINGS STUDIO SHOOTS 2 & 3
STUDIO SHOOT 2: 5/5/16
Heading back to the studio for the second shoot I was looking to put right all of the things that did not work too well on the first shoot and to pick up and try out some new things, techniques and approaches that came out of the first shoot. Getting the studio set up was far easier as I had the plans from the last shoot so staging it and setting up all of the lighting the same as the last shoot took far less time but still took about an hour. The family once again came over albeit with a little more trepidation following the issues from the last shoot. I had skinnied down the questions, discussed things through with the boys beofre the shoot and had planned all that needed doing down to a realistic hour and a half. They arrived at the same time but this time we were ready to shoot by 5:15.

HOWEVER disaster struck. Bands had been noisily rehearsing as normal in the Film theatre opposite the TV studio but they always finished by 5:00 on a Thursday and their was no noise from the film theatre so I assumed they had. The first recording of the boys initial pieces to camera went well BUT then a band struck up. We managed to record another short piece and then the band sparked up again. When I checked the sound it was evident all over my recording was their performance and there was no technical way to avoid it. Visiting the Film theatre where the bands were and speaking to the lecturer I was informed that they were sound checking until 6:00 and then they were putting on a performance until 9:00. They had an audience coming in and there was no way to stop their bands! I stressed that it would have been good to be notified as they were NEVER in after 5:00 but they said they did not think to. I begged for any quiet time and they did say that I could have 10 minutes from 5:50-6:00 as after that the audience were arriving and the performance would begin.
All this was far from ideal but was better than nothing and would be the last time I could get the boys into the TV studio and meet my deadline so I would have to roll with it. Returning to the TV studio and briefing the boys we would need 100% focus for 10 minutes. I edited the questions and statements I needed to record of the boys down to an absolute minimum and focussed solely on the ones where I needed all three boys interacting off each other at the same time. We managed to just about get this footage as there was no way it could be done anywhere but the TV studio due to kit and set up. I then resolved myself and the boys to having to create a mini one camera set up at home to record the other bits. They received a well overdue trip to the lego section of Toys R Us and a KFC as their reward on the way home.
HOME STUDIO SHOOT: 7/5/16
There were a few of the elements still left to record most importantly the parents comments and the idea of having all 3 images of one of the boys on all the screens at the same time so it would look like they were chatting to themselves but as other people also if you like. To do this I had to create a home studio set up.

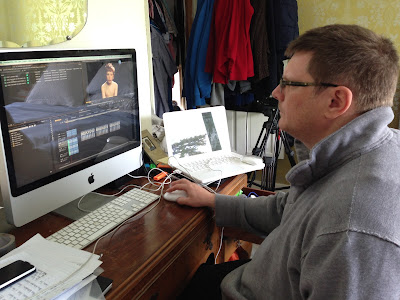
The kit for this was the same camera and sound setup Canon 600D with mains power, TASCAM DR-70D audio recorder, Senheisser rifle mic, mic stand and leads etc. HOWEVER the tricky bit was squeezing it all into one room. I chose the largest (our bedroom) and had to black out the windows with foil and set dress with a large black curtain I had "borrowed" from the TV studio. I also had to get hold of 3 lights (3X 300W Ianarro's) as there was obviously no lighting rig available. Space was at an absolute premium and kit was everywhere as you can see from the photos but as a "makeshift" studio it worked.

The image on screen looked great BUT whilst trying to match the lighting and white balance as best as I could and the boys hair and appearance with the studio shoot it was really hard. This is likely to create issues down the line but there was simply no avoiding it due to the fact of a different time, location and lighting sources. the sound will also feel very different which will be OK if the footage of the shoots appears in the same section. BUT if clips from different shoots appear side by side they will look different. This may be incorporated into the overall feel though perhaps as it does add an interesting texture and dynamic.

The shoots went fairly well and the boys were more relaxed and as I have mentioned before filming is a lot smoother when they are filmed individually. I recorded the pieces where they are voicing their parents views on their personalities and this went well. Following this I did manage to stage the boys shots where they would be individually on all three screens at the same time and interacting. I did a dummy test for this directing them as to where they would need to look and pretending the other screens were and guesstimating how long they would have been speaking for therefore how long to keep their gaze there. It was not an exact science but it went OK so I got all of these filmed too.
Heading back to the studio for the second shoot I was looking to put right all of the things that did not work too well on the first shoot and to pick up and try out some new things, techniques and approaches that came out of the first shoot. Getting the studio set up was far easier as I had the plans from the last shoot so staging it and setting up all of the lighting the same as the last shoot took far less time but still took about an hour. The family once again came over albeit with a little more trepidation following the issues from the last shoot. I had skinnied down the questions, discussed things through with the boys beofre the shoot and had planned all that needed doing down to a realistic hour and a half. They arrived at the same time but this time we were ready to shoot by 5:15.

HOWEVER disaster struck. Bands had been noisily rehearsing as normal in the Film theatre opposite the TV studio but they always finished by 5:00 on a Thursday and their was no noise from the film theatre so I assumed they had. The first recording of the boys initial pieces to camera went well BUT then a band struck up. We managed to record another short piece and then the band sparked up again. When I checked the sound it was evident all over my recording was their performance and there was no technical way to avoid it. Visiting the Film theatre where the bands were and speaking to the lecturer I was informed that they were sound checking until 6:00 and then they were putting on a performance until 9:00. They had an audience coming in and there was no way to stop their bands! I stressed that it would have been good to be notified as they were NEVER in after 5:00 but they said they did not think to. I begged for any quiet time and they did say that I could have 10 minutes from 5:50-6:00 as after that the audience were arriving and the performance would begin.
All this was far from ideal but was better than nothing and would be the last time I could get the boys into the TV studio and meet my deadline so I would have to roll with it. Returning to the TV studio and briefing the boys we would need 100% focus for 10 minutes. I edited the questions and statements I needed to record of the boys down to an absolute minimum and focussed solely on the ones where I needed all three boys interacting off each other at the same time. We managed to just about get this footage as there was no way it could be done anywhere but the TV studio due to kit and set up. I then resolved myself and the boys to having to create a mini one camera set up at home to record the other bits. They received a well overdue trip to the lego section of Toys R Us and a KFC as their reward on the way home.
HOME STUDIO SHOOT: 7/5/16
There were a few of the elements still left to record most importantly the parents comments and the idea of having all 3 images of one of the boys on all the screens at the same time so it would look like they were chatting to themselves but as other people also if you like. To do this I had to create a home studio set up.


The image on screen looked great BUT whilst trying to match the lighting and white balance as best as I could and the boys hair and appearance with the studio shoot it was really hard. This is likely to create issues down the line but there was simply no avoiding it due to the fact of a different time, location and lighting sources. the sound will also feel very different which will be OK if the footage of the shoots appears in the same section. BUT if clips from different shoots appear side by side they will look different. This may be incorporated into the overall feel though perhaps as it does add an interesting texture and dynamic.

The shoots went fairly well and the boys were more relaxed and as I have mentioned before filming is a lot smoother when they are filmed individually. I recorded the pieces where they are voicing their parents views on their personalities and this went well. Following this I did manage to stage the boys shots where they would be individually on all three screens at the same time and interacting. I did a dummy test for this directing them as to where they would need to look and pretending the other screens were and guesstimating how long they would have been speaking for therefore how long to keep their gaze there. It was not an exact science but it went OK so I got all of these filmed too.
Thursday, 5 May 2016
SIBLINGS: FINAL INSTALLATION TESTS AND KIT LIST
I considered and experimented with all of the following in the run up to deciding how to set up my installation in the TV Studio at Suffolk New College. I chose this venue due to it being the right size to fit in three large screen set up, its ability to be blacked out and the lack of a similar space available at UCS for the project.
- 3 Projectors ideally the same and with similar picture quality.
- 3 ways to play the video content. Possibly laptops OR buy some media players.
- 3 VGA leads to connect the laptops or media players to.
- 3 Speakers or sets of speakers. Ideally with own built in amplification. To run from above.
- Leads (phono OR mini jack) about 3-4 metres long to connect speakers to media playing devices.
- 3 plinths OR a table with a black blanket etc to cover to mount projectors on.
- 3 16:9 screens to project onto. Size a maximum of 1.6m by 0.9m to allow for set up.
- Cord, fishing line or string to hang projection screens from the lighting rig.
I tested a variety of versions of this kit basically on laptops plugged into the projectors. I did this without the hanging screens I propose to use as due to time and availability of the location I can only install nearer the exhibition time.
TECHNOLOGY CHOICE
From these the set up that worked best was the three lap-tops and projectors. I did consider players and DVD options but laptops worked just as well under testing. I did consider TV screens but I felt this did not give me the scale and impact I was after as I could not get hold of three that were big enough. This was mainly due to a cost consideration and also time and technical aspects to buy and install all the software and hardware needed. These were 3 laptops equipped with Quicktime player so they would play the clips linked to three projectors with VGA leads. I did look at spending on the media players as they would eliminate the need to have laptops to hide in the set/exhibition space somewhere. This I felt could be done fairly easily under a table holding the projectors and the black curtain hiding this with the laptops underneath. As far as the sound went I wanted each screen to have its own speakers set up behind them so it would look like the sound was coming from the screens and they were talking to you. I managed to source three sets of dynamic speakers running off their own power and purchased three 5 metre mini jack to phono cables to run from the laptops to the speakers.


HIDING THE TECHNOLOGY
When I have been to galleries to look at video installations if projections are used rather than screens they are either back projected as I mentioned earlier or the projectors are on view. I am happy to keep the projectors on view BUT will need to hide the lap-tops. This will be done by setting up a table for the projectors to get them some hight for the projection, covering it in a black fabric and hiding the laptops underneath. The speakers will be raised off the ground by three black plinths and they will be connected by black cables.

SCREENS, SIZE AND BUILDING.
I did consider getting free standing screens but I did not want the clutter and loved "NOW" by Chantal Ackerman where she had slightly transparent perspex screens suspended from the ceiling and back projected onto them. My budget could not run to perspex (this idea would have to wait for another day) but I could suspend screens from the lighting rig. I have worked up a prototype screen. I made this using lengths of white photography backdrop paper from a spool I sourced. I will be attaching thin lengths of wood at the top and bottom the top one to fix and hang it from the ceiling and the bottom one to get the paper to hang straight. This worked well. lengths of strong enough fishing line or cord will secure these to the lighting rig.

Screen size was determined by the space itself and how far the projectors had to be from the screens to fill them. The bigger you needed the image to be the further away the projector needed to be and I ran some tests on the projectors to work this out. I also made lots of measurements of the studio space to determine its physical size and also where sockets and lighting rigs were for fixing the hanging screens to and to enable planning of the screen set up. the studio is 5.5m deep by 5m wide inside the black curtained area so this was the space I had to work with.

From looking at the measurements of the space I began to consider screen size. I wanted the biggest screen size I could find. I discovered that three widescreen 16:9 100' screens (221cm by 125cm) would fit but the angles that the screens would be at would be too tight to work with the video footage itself. They would also have to be too close together and the projectors would have to overlap to be far enough away to project fully onto a screen that big. this would also distance the audience from the piece as they would have to stand way back to avoid interfering with the projections which I did not want. 84" screens(186cm by 104cm) worked better but still the angle of the screens was also too steep and there was no space between the screens and the projectors would still have to be set too far back to allow the audience to get close avoiding the immersive experience I was after.

The ideal compromise was 72" screens ((159cm by 90cm). These allowed for a shallower angle if set up properly see right image below and allowed for the projectors to be set on the table 225 cm from the screen. Whilst still not exactly what I was after i did not want to compromise screen size any bigger as it kept the audience too far away. This is the set up I will be going with.

THE INSTALLATION SPACE
This will be a black box lit only by the screens and projections. One screen in the middle with two angles at about 30 degrees either side of it. All the screens will be the same size and at about eye level suspended fro the lighting grid. The projectors will be central on a table off the ground and this will be covered by black material with the laptops hidden away underneath. Speakers will be positioned behind each of the screens attached to the laptop playing their projection and therefore their sound. There will be a brief overview of the piece on the exhibition door explaining it.
TECHNOLOGY CHOICE
From these the set up that worked best was the three lap-tops and projectors. I did consider players and DVD options but laptops worked just as well under testing. I did consider TV screens but I felt this did not give me the scale and impact I was after as I could not get hold of three that were big enough. This was mainly due to a cost consideration and also time and technical aspects to buy and install all the software and hardware needed. These were 3 laptops equipped with Quicktime player so they would play the clips linked to three projectors with VGA leads. I did look at spending on the media players as they would eliminate the need to have laptops to hide in the set/exhibition space somewhere. This I felt could be done fairly easily under a table holding the projectors and the black curtain hiding this with the laptops underneath. As far as the sound went I wanted each screen to have its own speakers set up behind them so it would look like the sound was coming from the screens and they were talking to you. I managed to source three sets of dynamic speakers running off their own power and purchased three 5 metre mini jack to phono cables to run from the laptops to the speakers.


When I have been to galleries to look at video installations if projections are used rather than screens they are either back projected as I mentioned earlier or the projectors are on view. I am happy to keep the projectors on view BUT will need to hide the lap-tops. This will be done by setting up a table for the projectors to get them some hight for the projection, covering it in a black fabric and hiding the laptops underneath. The speakers will be raised off the ground by three black plinths and they will be connected by black cables.

SCREENS, SIZE AND BUILDING.
I did consider getting free standing screens but I did not want the clutter and loved "NOW" by Chantal Ackerman where she had slightly transparent perspex screens suspended from the ceiling and back projected onto them. My budget could not run to perspex (this idea would have to wait for another day) but I could suspend screens from the lighting rig. I have worked up a prototype screen. I made this using lengths of white photography backdrop paper from a spool I sourced. I will be attaching thin lengths of wood at the top and bottom the top one to fix and hang it from the ceiling and the bottom one to get the paper to hang straight. This worked well. lengths of strong enough fishing line or cord will secure these to the lighting rig.
Screen size was determined by the space itself and how far the projectors had to be from the screens to fill them. The bigger you needed the image to be the further away the projector needed to be and I ran some tests on the projectors to work this out. I also made lots of measurements of the studio space to determine its physical size and also where sockets and lighting rigs were for fixing the hanging screens to and to enable planning of the screen set up. the studio is 5.5m deep by 5m wide inside the black curtained area so this was the space I had to work with.

From looking at the measurements of the space I began to consider screen size. I wanted the biggest screen size I could find. I discovered that three widescreen 16:9 100' screens (221cm by 125cm) would fit but the angles that the screens would be at would be too tight to work with the video footage itself. They would also have to be too close together and the projectors would have to overlap to be far enough away to project fully onto a screen that big. this would also distance the audience from the piece as they would have to stand way back to avoid interfering with the projections which I did not want. 84" screens(186cm by 104cm) worked better but still the angle of the screens was also too steep and there was no space between the screens and the projectors would still have to be set too far back to allow the audience to get close avoiding the immersive experience I was after.

The ideal compromise was 72" screens ((159cm by 90cm). These allowed for a shallower angle if set up properly see right image below and allowed for the projectors to be set on the table 225 cm from the screen. Whilst still not exactly what I was after i did not want to compromise screen size any bigger as it kept the audience too far away. This is the set up I will be going with.
THE INSTALLATION SPACE
This will be a black box lit only by the screens and projections. One screen in the middle with two angles at about 30 degrees either side of it. All the screens will be the same size and at about eye level suspended fro the lighting grid. The projectors will be central on a table off the ground and this will be covered by black material with the laptops hidden away underneath. Speakers will be positioned behind each of the screens attached to the laptop playing their projection and therefore their sound. There will be a brief overview of the piece on the exhibition door explaining it.
Sunday, 1 May 2016
SIBLINGS: INITIAL POST PRODUCTION
Working with the footage of the first shoot it was very obvious that many of the issues that I flagged up were indeed just that and would need putting right with a second shoot. I am cutting Adobe Premiere Pro as I have the software at home and therefore I can use all available time and not be dependent on any outside sources.
SCALE OF THE EDIT
This is huge and complicated. Whilst having done the tests for screening to my MA peers I underestimated the size of the project as these had only been two or three clips edited together to check that they worked. I am aiming for the piece to be no more than 20 minutes. Whilst this is an OK length to work with in actuality it is 60 minutes to edit as I am actually doing three twenty minute edits in effect as I am editing for three screens! These all need editing, most of them lip-synching, the sound tidied up and watching to make sure no errors creep in.
USING PREMIERE PRO TECHNCALLY
The best way to approach the edit is to layer it all up in the timeline stacking it. This works best with what will be the left hand screen on video track 1 with the middle screen and right hand screen being on video tracks 2 and 3 respectively. Below I have given an outline of potential issues and opportunities of the project with one eye on re-shooting some elements and adding others to make the piece work better.

LENGTH OF INSTALLATION
Length of the films may have to be shortened. This is due to the above and also as I am sure I have only got 10 odd minutes to screen it to my tutors for assessment so perhaps working to a really tight best bits 10 minute edit is the way to go initially.
PROJECT FILE MANAGEMENT AND WORKFLOW
Getting organised is always the key to a successful edit and this is definitely the case he times 3! As there are three screens there are potentially three times the issues and confusion as a normal edit. I have decided to break all of the four areas up into there own folders teachers, boys, psychologists and parents creating folders to keep the files in. As far as file naming goes I have created a labelling system 1L Isaac Psychologists for example for when I have imported the raw footage. 1L being screen one left, Isaac being the boy in the clip and then whose thoughts they are saying. When editing I shot the boys all saying the psychologists thoughts for example as one long clip. Slicing this up into 8-9 sub clips will take an age SO I will edit all of one boys footage at a time in a sequence based on whose words they are voicing and slice it up in there into the 8-9 clips. Then slice up the other two boys too so for example the psychologists clips of all the boys will be in their own sequence. From here in the same sequence I will layer up the boys voices so that they are all combined and overlaid working together as they will be for the installation. Then these can be cut and pasted in to MASTER track containing all of the clips.

SYNCHING AUDIO
This is really tricky as if the boys were recorded at the same time it is less of an issue but the problem comes down to the actual screening. I can make these work in a timeline on the editing software fine but getting it all bang on. However for the pieces recorded individually with the boys that need adding together I will need to create the right spacing and fluidity as each son contributes.
SYNCHING AND PREPARING FOR THE INSTALLATION
NARRATIVE AND STRUCTURAL GYMNASTICS
This is the tricky bit and stringing all of the footage together. The bits with the boys interacting as a three all obviously work as they are pretty much appearing "as live" as they were recorded obviously considering the above factors. They are all on a certain screen and either left, middle or right. HOWEVER for the psychologists, teachers and some of the parents thoughts the boys are voicing this is a whole different story. I want to create a randomness as to which screen the boys appear on and also who speaks first, second and third and creating randomness is trick. I created some grids to help me do this and to help plan how to link and theme the sections together.

FRAMING THE TOPICS AND VOICES/OPINIONS
The plan is to have all of the boys on screen discussing either the same topic or different thoughts and aspects of the same topic. This will involve theming the comments of the psychologists, teachers and parents. For instance psychologists comments on the boys personalities for instance are they scholarly mathematically, with the written word or creative and artistic. Framing the comments in themes will allow the audience to get a feel for how the siblings are regarded birth order wise. Also getting one son to set up the theme of the three opinions "In class" for school to frame who the comments came from for instance.
NARRATIVE FLOW
Not 100% sure at the moment but i do want to give the piece some narrative structure and vary the contributors thoughts with the boys as they bring a real energy to the piece. As well as just contributions I want to give the boys screen time saying nothing on-screen and just observing them giving another insight into their characters by watching their physicality and how they inhabit the screen space. I do want to provide an opening though of the boys introducing themselves and also a sign out and summation at the end. Titles to introduce the piece will be added too.

RECORDING THE LIP-SYNC
As I have mentioned earlier in the blog the aim is to get FIRSTLY get the thoughts from the different people commenting on the boys, for instance teachers views written down. THEN record the boys saying their words on camera. THEN using these clips of the boys show these to the teachers so they can get a feel for their speech patterns and mimic them whilst recording the voice overs that will replace the boys voices. This is never going to be bang on unless time is not a factor but you can get pretty close and then any tidying up to get the lip-synch as bang on as possible done in the edit.
VO & LIP-SYNCH WORKING?
The comments from the boys voicing the words of others worked fairly well. I used a studio set TheVO I recorded of a lecturer friend (Matthew Townsend a performing arts lecturer and actor) to lip synch to the boys saying them worked really well and was a success. The process however can be time consuming to try and get the lip-synch as tight as possible I will need to get the other voice overs done ASAP as they are pretty time consuming to synch them to the boys voices in post.

GRADING AND MAKING THE FOOTAGE LOOK THE SAME
This is close but not white balancing during the filming and the different lighting colours some more orange, some bluer (see above photo). Using three identical cameras meant that this was not too much of an issue but there are difference between the boys images depending on which of the three positions they were filmed in. Colour grading is a huge job and being a perfectionist it was my original intention to get the images always looking identical in terms of shot size, background AND lighting and colour. HOWEVER I will work with what i have for now as different tones and slight changed in tone and colour are a little bit interesting and will review this after the edit is starting to take more shape.

This is huge and complicated. Whilst having done the tests for screening to my MA peers I underestimated the size of the project as these had only been two or three clips edited together to check that they worked. I am aiming for the piece to be no more than 20 minutes. Whilst this is an OK length to work with in actuality it is 60 minutes to edit as I am actually doing three twenty minute edits in effect as I am editing for three screens! These all need editing, most of them lip-synching, the sound tidied up and watching to make sure no errors creep in.
USING PREMIERE PRO TECHNCALLY
The best way to approach the edit is to layer it all up in the timeline stacking it. This works best with what will be the left hand screen on video track 1 with the middle screen and right hand screen being on video tracks 2 and 3 respectively. Below I have given an outline of potential issues and opportunities of the project with one eye on re-shooting some elements and adding others to make the piece work better.

LENGTH OF INSTALLATION
Length of the films may have to be shortened. This is due to the above and also as I am sure I have only got 10 odd minutes to screen it to my tutors for assessment so perhaps working to a really tight best bits 10 minute edit is the way to go initially.
PROJECT FILE MANAGEMENT AND WORKFLOW
Getting organised is always the key to a successful edit and this is definitely the case he times 3! As there are three screens there are potentially three times the issues and confusion as a normal edit. I have decided to break all of the four areas up into there own folders teachers, boys, psychologists and parents creating folders to keep the files in. As far as file naming goes I have created a labelling system 1L Isaac Psychologists for example for when I have imported the raw footage. 1L being screen one left, Isaac being the boy in the clip and then whose thoughts they are saying. When editing I shot the boys all saying the psychologists thoughts for example as one long clip. Slicing this up into 8-9 sub clips will take an age SO I will edit all of one boys footage at a time in a sequence based on whose words they are voicing and slice it up in there into the 8-9 clips. Then slice up the other two boys too so for example the psychologists clips of all the boys will be in their own sequence. From here in the same sequence I will layer up the boys voices so that they are all combined and overlaid working together as they will be for the installation. Then these can be cut and pasted in to MASTER track containing all of the clips.

SYNCHING AUDIO
This is really tricky as if the boys were recorded at the same time it is less of an issue but the problem comes down to the actual screening. I can make these work in a timeline on the editing software fine but getting it all bang on. However for the pieces recorded individually with the boys that need adding together I will need to create the right spacing and fluidity as each son contributes.
SYNCHING AND PREPARING FOR THE INSTALLATION
However even with these bits issues may creep in with sound overspill to the microphones of the other boys. If synchronicity of the clips and sound could be guaranteed to be 100% bang on then this is not an issue as the sound being played from all there clips to the screens would be in synch. However this looks very tricky and expensive to do for the installation. SO I will have to firstly erase any overspill from the other boys talking from the individual tracks so the only voice on each track will be the boy appearing on that screen. Then I will need to test and factor in the fact that the projections in the installation are unlikely to be bang in synch. So a pause (but not too long) will need to be left between each of the boys talking to allow for this so they do not end up talking over each other. It will be a "forced naturality" and will need testing on the screens ASAP to see what works best.
NARRATIVE AND STRUCTURAL GYMNASTICS
This is the tricky bit and stringing all of the footage together. The bits with the boys interacting as a three all obviously work as they are pretty much appearing "as live" as they were recorded obviously considering the above factors. They are all on a certain screen and either left, middle or right. HOWEVER for the psychologists, teachers and some of the parents thoughts the boys are voicing this is a whole different story. I want to create a randomness as to which screen the boys appear on and also who speaks first, second and third and creating randomness is trick. I created some grids to help me do this and to help plan how to link and theme the sections together.

FRAMING THE TOPICS AND VOICES/OPINIONS
The plan is to have all of the boys on screen discussing either the same topic or different thoughts and aspects of the same topic. This will involve theming the comments of the psychologists, teachers and parents. For instance psychologists comments on the boys personalities for instance are they scholarly mathematically, with the written word or creative and artistic. Framing the comments in themes will allow the audience to get a feel for how the siblings are regarded birth order wise. Also getting one son to set up the theme of the three opinions "In class" for school to frame who the comments came from for instance.
NARRATIVE FLOW
Not 100% sure at the moment but i do want to give the piece some narrative structure and vary the contributors thoughts with the boys as they bring a real energy to the piece. As well as just contributions I want to give the boys screen time saying nothing on-screen and just observing them giving another insight into their characters by watching their physicality and how they inhabit the screen space. I do want to provide an opening though of the boys introducing themselves and also a sign out and summation at the end. Titles to introduce the piece will be added too.

RECORDING THE LIP-SYNC
As I have mentioned earlier in the blog the aim is to get FIRSTLY get the thoughts from the different people commenting on the boys, for instance teachers views written down. THEN record the boys saying their words on camera. THEN using these clips of the boys show these to the teachers so they can get a feel for their speech patterns and mimic them whilst recording the voice overs that will replace the boys voices. This is never going to be bang on unless time is not a factor but you can get pretty close and then any tidying up to get the lip-synch as bang on as possible done in the edit.
VO & LIP-SYNCH WORKING?
The comments from the boys voicing the words of others worked fairly well. I used a studio set TheVO I recorded of a lecturer friend (Matthew Townsend a performing arts lecturer and actor) to lip synch to the boys saying them worked really well and was a success. The process however can be time consuming to try and get the lip-synch as tight as possible I will need to get the other voice overs done ASAP as they are pretty time consuming to synch them to the boys voices in post.

GRADING AND MAKING THE FOOTAGE LOOK THE SAME
This is close but not white balancing during the filming and the different lighting colours some more orange, some bluer (see above photo). Using three identical cameras meant that this was not too much of an issue but there are difference between the boys images depending on which of the three positions they were filmed in. Colour grading is a huge job and being a perfectionist it was my original intention to get the images always looking identical in terms of shot size, background AND lighting and colour. HOWEVER I will work with what i have for now as different tones and slight changed in tone and colour are a little bit interesting and will review this after the edit is starting to take more shape.
Subscribe to:
Comments (Atom)